Mold Testing: Modern Strategies (Part 3)
When it comes to choosing the right mold sampling method, it’s crucial to consider various factors

When it comes to choosing the right mold sampling method, it’s crucial to consider various factors

Real Estate transactions are contracts where time is of the essence.

(Actual footage during an inspection – looking for a plumbing leak)
Inspect Montana’s first approach to every inspection is to look directly at all aspects of the property. There are times when parts of the property are structured such that we are not able to get to them due to space limitations or heights or weather. We have drones for roofs that aren’t accessible, thermography camera’s to see temp differences in materials that reveal water leaks or missing insulation, and for crawl spaces that are too narrow for us to crawl through we have BigCrawler.


For crawl spaces, if the space is too short for us to enter we will deploy the BigCrawler. This tool stands 6 inches in height with four-wheel steering and a low center of gravity allowing this crawler to get in and out of debris-filled crawl spaces without getting stuck or caught. Crawling over pipes, plastic, bricks, etc. makes this crawler the tool of choice for these situations.
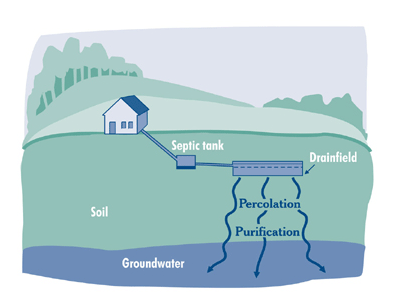
 Septic systems treat and disperse relatively small volumes of wastewater from individual and small numbers of homes and commercial buildings. Septic system regulation is usually a state and local responsibility. The EPA provides information to homeowners and assistance to state and local governments to improve the management of septic systems to prevent failures that could harm human health and water quality.
If your septic tank failed, or you know someone whose did, you are not alone. As a homeowner, you are responsible for maintaining your septic system. Proper septic system maintenance will help keep your system from failing and will help maintain your investment in your home. Failing septic systems can contaminate the ground water that you and your neighbors drink and can pollute nearby rivers, lakes and coastal waters. Here is a homeowners guide to septics in Montana: Guide

You have been a property owner for years with a good rent flow. It is time to move on from a particular property, so you have decided to sell. You find a great RE Agent and list your property for sale. A buyer comes along and loves the property and now you are under contract. The buyer is from out of town and orders a property inspection that includes testing for meth. The results come back from the lab and show levels of meth at >= 1.5 ug/100 cm2, meaning that your property is contaminated, and you now have a legal liability to disclose this information to any prospective buyer or renter.
This is a real concern for residential and commercial property owners. But is your property a total loss? NO. Maybe your buyer may have walked away from this deal BUT you do have a way forward. Let’s quickly see what that might look like.
The good news in this story is that your property was not used as a clandestine lab and was not reported by law enforcement to the DEQ. Thus your property is not on the DEQ list of contaminated properties.
The main issue you have now is an “unfit” property for health reasons and a legal liability to disclose the contamination to any prospective renters or buyers. You could relist your property and try to sell it with the proper disclosures at a discounted price, but that is just not your style.
Your goal is to obtain a “Certificate of Fitness” from a DEQ Certified Contractor. Obtaining a Certificate of Fitness will restore the property as safely inhabitable & remove your legal liability to disclose that there was meth contamination in the property.
When the DEQ first got involved in the meth problem the standard in the industry was to remediate a property by removing all contaminated components including the drywall back to the studs. This was due to the requirement of meeting the somewhat arbitrary threshold of < 0.1 ug/100 cm2. That just happened to be the analytical measurement limit in the lab. That level was stringent, but was it necessary from a health standpoint?
As MT gained an understanding of the level at which there are true health concerns, balanced by the cost to effectively remediate, the standard required to obtain a Certificate of Fitness was adjusted. So, the law was recently changed, and a new limit has been established at <1.5 ug/cm2. Another change in MT is the expansion of the law to place liability on property owners whose properties have been contaminated by meth smoke. As well, rules were changed regarding the sample testing procedure. All these changes I will briefly discuss below.
The first step in getting a “certificate of fitness” is to find a DEQ Certified Remediation Contractor. Most properties today are cleaned and will only replace those items that cannot be cleaned. Some items, such as appliances, vent fans, etc. are not worth the cost of cleaning and will be replaced.
Even though your property is not on the DEQ list of contaminated properties you still need to follow their approved procedures & rules in order to be issued a Certificate of Fitness and remove your liability. Now that you have found a DEQ Certified Contractor they will get to work on remediating your property.
The contractor will remediate in 3 specific phases: Assessment Plan, Work Plan, and Clearance Plan. Each phase has a specific purpose. The assessment plan will determine the extent of the contamination. The work plan will determine the specific actions to be taken to properly remediate the property. The clearance plan is actually performed by a separate DEQ-certified contractor. The clearance plan will determine the sample testing based on the assessment & work plans and the rules established by the DEQ that will be used to assure that property is now testing ‘non-detect’ (ND). ND is all samples coming back < 1.5 ug/100 cm2.
You can read the approved rules here: ARM 17.74.519. What does that actually mean to you? This is where Inspect Montana can help you directly. Inspect Montana is a DEQ-certified Contractor, and our sole purpose is to perform the testing necessary to provide a Certificate of Fitness for your property.
Let’s say your property is a 3 bedroom 2 bath home with a detached garage. The property has forced air and exhaust fans in both bathrooms and the kitchen range hood vented to the outside. During remediation, the bathroom exhaust fans, and the kitchen hood were replaced with new appliances and associated ducting. The rest of the property was cleaned using approved techniques to remove any meth from contaminated materials. The property is now ready to be re-tested prior to any painting.
A sampling plan might include:
That is a total of 21 samples. The samples would be sent to an approved analytical lab that uses the NIOSH 9111 testing methodology. All samples would need to return as ‘non-detect’ (ND). Meaning that no sample tested at or higher than 1.5 ug/100 cm2. With this report of all samples coming back ND, the DEQ contractor will follow up with the DEQ demonstrating that your property now meets the standard, and a Certificate of Fitness can be released to you.
Now that you have cleared your property, you can finish the remediation process by having any painting and finishes completed, plus any other items that may be on the punch list. You are now cleared of any liability and are no longer required to disclose that the property was ever contaminated with methamphetamines.
Inspect Montana is here to help you. If you are buying or selling a property, when you need a property inspection we are here to help. Inspect Montana is your solutions-based, one-stop-shop property inspection company with testing services for radon, water, sewer scope, meth, lead-based paint, asbestos, etc.

 orienting a new home to take advantage of the warmth of the Sun will increase the home’s appeal and marketability. For homeowners, it will increase their indoor comfort and reduce their energy bills.
Facts and Figures
The Sun’s True Position
Schoolchildren (and most homeowners) will tell you that the Sun rises in the east and sets in the west, and, if this were true, building orientation would be a fairly simple matter. In reality, the sun rises and sets in the east and west only on the autumnal and vernal equinoxes, and something very different happens during the remaining 363 days of the year. The Earth’s tilt causes the Sun to rise and set slightly south of east and west in the winter, and slightly north of east and west in the summer. This slight angle depends on the time of year and the observer’s distance from the equator.
As a result, the winter sun spends all of its time in the southern sky, and the summer sun spends much of its time in the northern sky (the sun crosses over into the southern sky during part of the day, depending on latitude). In the Southern Hemisphere, all of these directions are reversed, so the winter sun rises and sets in the northeast and northwest, respectively, and the summer sun rises and sets in the southeast and southwest, respectively.
How the Sun’s Variations in Position Can Affect Building Design
The relative position of the Sun is a major factor in heat gain in buildings, which makes accurate orientation of the building a fundamental consideration in passive solar construction.
Most importantly, a rectangular house’s ridgeline should run east-west to maximize the length of the southern side, which should also incorporate several windows in its design. For this reason, fewer windows should be located on the northern side of the house, where the summer sun can be intense. A deep roof overhang can shade the few windows in this area, as can different types of shade trees and bushes. Research supports an east-west ridgeline. Homes re-oriented toward the Sun without any additional solar features save between 10% and 20% and some can save up to 40% on home heating, according to the Bonneville Power Administration and the City of San Jose, California.
Builders should note that these directions are given in reference to the Sun and not magnetic north, which can vary significantly from the Sun’s actual position. Magnetic north, as read from a compass, can still be used as a reference if the builder adjusts the figure based on the location-specific magnetic variation, which can be found in publicly available maps.
Building Tips for New Construction
The following tips will also assist homeowners and builders in maximizing heat gain through building orientation:


Ultimately, factors such as street appeal and the property’s lot dimensions may restrict a builder’s ability to orient a building in strict accordance with passive solar techniques. Even while working under these constraints, however, a builder can still create an energy-efficient home through the implementation of energy-saving features, such as low-E windows, adequate insulation, air sealing, and cool roofs. Read more about these energy investment features in InterNACHI’s Green Resources for Inspectors and Consumers.

Part of responsible homeownership includes, of course, regular home maintenance. And there are some tasks that, if deferred, can lead to a home system that’s inefficient and overworked, which can result in problems and expenses. One such task is changing the filter of the home’s HVAC system. It’s simple and inexpensive, and taking care of it at least every three months can me an the difference between optimum comfort and avoidable repairs.
What Can Go Wrong
Most homes have some sort of furnace or heat pump, and many of those homes (especially newer ones) have combined heating, ventilation and air-conditioning or HVAC systems. Each type uses some type of air filter or screen to prevent larger airborne particles (up to 40 microns) from entering the system and clogging sensitive machinery. A system that has a dirty filter can suffer from pressure drop, which can lead to reduced air flow, or “blow-out,” resulting in no air infiltration at all. Any of these conditions can cause the system to work harder to keep the home warm or cool (depending on the season and the setting). And any mechanical component that has to work harder to run efficiently puts undue stress on the whole system, which can lead to premature failure, resulting in repair or replacement.
Also, a dirty filter that’s exposed to condensation can become damp, which can lead to mold growth that can be spread throughout the home by the HVAC system. This can lead to serious health consequences, not to mention a compromised unit that will likely require servicing and may require replacement, depending on the severity of the moisture problem.
Types of Filters
Most HVAC and furnace filters are disposable, made of biodegradable paper or similar media, and shaped in cells, screens or fins designed to trap as much airborne debris as possible. Filters can typically be purchased in economical multi-packs, and there are many types that will fit different models of furnace/HVAC units. It’s important to use the appropriate filter for your unit; using the wrong filter that doesn’t fit the unit properly can create the same types of problems as having a dirty filter. Your HVAC installer can show you where the filter goes and how to remove the old one and install a new one. Your unit may also have an affixed label with directions for easy filter replacement.
How Often?
Your HVAC or furnace technician should service your unit once a year. Because a furnace/HVAC unit contains moving parts, it’s important that belts are not cracked and dry, ventilation ductwork is not gapped, cracked or rusted, and components, such as coils and fans, are clog-free and adequately lubricated for unimpeded operation. This sort of evaluation is best left to the professional, unless the homeowner has had the appropriate training.
The filter of the unit, especially if it’s an HVAC unit that will tend to get nearly year-round use, should be changed by the homeowner at least every three months, but possibly more often.
Check your filter’s condition and change it once a month if:
Change the filter immediately if:
Tips on Changing the Filter
Call a technician for servicing if:

Seller inspections (sometimes referred to as pre-listing inspections) are becoming more popular because they virtually eliminate all the pitfalls and hassles associated with waiting to do the home inspection until a buyer is found. Seller inspections are arranged and paid for by the seller, usually just before the home goes on the market. The seller is the inspector’s client. The inspector works for the seller and generates a report for the seller. The seller then typically makes multiple copies of the report and shares them with potential buyers who tour the home for sale. Eventually, buyers are going to conduct an inspection. You may as well know what they are going to find by getting there first.
Let’s talk about the advantages of pre-inspections for sellers, agents, and buyers.

Log homes may be site-built or pre-cut in a factory for delivery to the site. Some log home manufacturers can also customize their designs. Before designing or purchasing a manufactured log home, you need to consider the following factors for energy efficiency.
In a log home, the wood helps provide some insulation. Wood’s thermal resistance (or resistance to heat flow) is measured by its R-value. The higher the R-value, the more thermal resistance. The R-value for wood ranges between 1.41 per inch (2.54 cm) for most softwoods, and 0.71 for most hardwoods. Ignoring the benefits of the thermal mass, a 6-inch (15.24 cm) thick log wall would have a clear-wall (a wall without windows or doors) R-value of just over 8.
Compared to a conventional wood stud wall (31 D2 inches [8.89 cm] insulation, sheathing, wallboard, a total of about R-14), the log wall is apparently a vastly inferior insulation system. Based only on this, log walls do not satisfy most building codes’ energy standards. However, to what extent a log building interacts with its surroundings depends greatly on the climate. Because of the log’s heat-storage capability, its large mass may cause the walls to behave considerably better in some climates than in others. Logs act like “thermal batteries” and can, under the right circumstances, store heat during the day and gradually release it at night. This generally increases the apparent R-value of a log by 0.1 per inch of thickness in mild, sunny climates that have a substantial temperature swing from day to night. Such climates generally exist in the Earth’s temperate zones between the 15th and 40th parallels.
Log homes are susceptible to developing air leaks. Air-dried logs are still about 15% to 20% water when the house is assembled or constructed. As the logs dry over the next few years, the logs shrink. The contraction and expansion of the logs open gaps between the logs, creating air leaks, which cause drafts and high heating requirements. To minimize air leakage, logs should be seasoned (dried in a protected space) for at least six months before construction begins. These are the best woods to use to avoid this problem, in order of effectiveness:
– cedar
– spruce
– pine
– fir
– larch
Since most manufacturers and experienced builders know of this shrinkage and resulting air leakage problems, many will kiln-dry the logs prior to finish-shaping and installation. Some also recommend using plastic gaskets and caulking compounds to seal gaps. These seals require regular inspection and re-sealing when necessary. To be safe, always hire an InterNACHI inspector.
Since trees absorb large amounts of water as they grow, the tree cells are also able to absorb water very readily after the wood has dried. For this reason, a log home is very hydroscopic—it can absorb water quickly. This promotes wood rot and insect infestation. It is strongly recommended that you protect the logs from any contact with any water or moisture. One moisture-control method is to use only waterproofed and insecticide-treated logs. Re-apply these treatments every few years for the life of the house. Generous roof overhangs, properly sized gutters, downspouts, and drainage plains around the house are also critical for moisture control.
Because log homes don’t have conventional wood-stud walls and insulation, they often don’t satisfy most building codes’ energy standards—usually, those involving required insulation R-values. However, several states—including Pennsylvania, Maine, and South Carolina—have exempted log-walled homes from normal energy compliance regulations. Others states, such as Washington, have approved “prescriptive packages” for various sizes of logs, but these may or may not make sense in terms of energy efficiency. The American Society of Heating, Refrigerating and Air-Conditioning Engineers (ASHRAE) 90.2 standard contains a thermal mass provision that may make it easier to get approval in those states that base their codes on this standard. To find out the log building code standards for your state, contact your city or county building code officials. Your state energy office may be able to provide information on energy codes recommended or enforced in your state.

The manufacture and use of methamphetamine have been going on in MT for…
Inspect Montana serves clients across Montana including Lolo, Missoula, Hamilton, Corvallis, Florence, Victor, Darby, Alberton, Polson, Ronan, St. Regis, Clinton, Stevensville, Philipsburg, Drummond, Frenchtown, St.Ignatius, Garrison, Lincoln, Sula, Pablo, Deer Lodge, Bitterroot Valley and throughout Western Montana.
Consult Montana Home Inspectors
Experience the Inspect Montana Difference.